When you first turn on STRUCTURE, you’ll see something similar to the image below on the built-in screen and the image in the preview window coming out of the CVBS VIDEO OUT ports on the front panel:
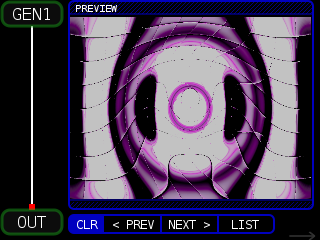
Along the left column of the screen is the NODE SET, which is a diagram that indicates the visual signal flow. This NODE SET contains two NODES: GEN1 (generator node number 1) and OUT (the output of STRUCTURE). The white line shows the path of the video from GEN1 to a red box on the OUT node.
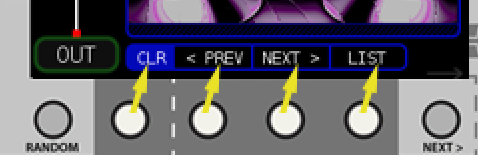
The top of the screen, to the right of the NODE SET, shows that we are on the PREVIEW page. Below the page title is the video out preview, and at the bottom of the screen are soft keys for CLR (Clear Selected NODES), < PREV (previous selected NODE files), NEXT > (next selected NODE files), and LIST (list available files for a selected NODE type). You access those actions by pressing the buttons immediately below the names.
The node GEN1 is running what’s called a GLSL fragment shader. GLSL stands for Graphics Library Shader Language and is a specialized C-like programming language that is optimized to run on the Graphics Processing Unit (GPU) and generates the graphics you see coming from STRUCTURE. You don’t need to know anything about GLSL shaders or programming to enjoy and use STRUCTURE. We designed STRUCTURE to be immediately useful as soon as it is powered on, and we also wanted to allow users who want to dig deeper to be able to load their own shaders. You can see and play around with the whole collection of GEN shaders used by STRUCTURE at http://glsl.erogenous-tones.com. But we’re getting ahead of ourselves here. We’ll talk more about shaders in a later section.
We ship STRUCTURE with over 500 GEN shaders so you have a diverse set of building blocks for your visuals. A quick way to change the GEN shader is to press the RANDOM button a few times until you find something you like. You can also press the NEXT > or < PREV soft keys to ‘walk through’ the list of GEN shaders.
Press the LIST soft key to select from the full list of available GEN shaders. Use the ENCODER knob to select a different shader, then press the LOAD soft key to load the new shader. There might be a short pause in OUTPUT while the new shader is loaded and compiled into the GPU. Press the CLOSE soft key to exit this screen and return to the PREVIEW PAGE.
HINT: When in the LIST screen, press and hold the JUMP soft key while turning the ENCODER knob to jump through the list by first letter in the shader list file names.
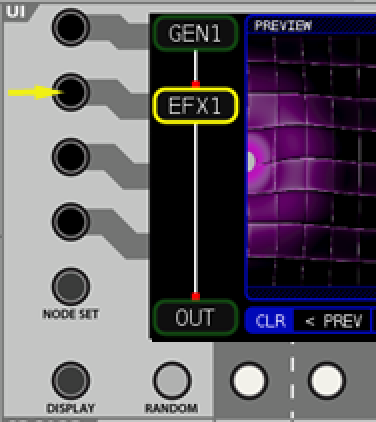
But wait, there’s more! While on the PREVIEW PAGE, turn the ENCODER knob clockwise one click to see the next NODE SET: GEN1->EFX1->OUT.
Now we are running the GEN NODE shader output to an EFX1 NODE (effect) and sending the result to the OUT NODE. There are many standard effects like pixellate, mirror, color shift, droste, Sobel, etc. and unique and experimental effects that transform and warp the input in constantly evolving and interesting ways.
With these two NODEs on the screen, if we press the < PREV or NEXT > soft keys or the RANDOM button, both the GEN1 and EFX1 shaders will be affected by the action. If you wanted to keep the GEN1 shader and only change the EFX1 shader, you can press the button to the left of the screen (indicated by a solid line on the front panel that connects the button to NODE) and the NODE outline will turn YELLOW to indicate it is SELECTED.
When one or more NODEs are selected, the RANDOM, < PREV, and NEXT > actions will only apply to the selected NODEs. If you press the LIST soft key, you will need to select a single NODE before the list of available shaders will be displayed.
If you want to lock a NODE’s settings so that RANDOM, < PREV, and NEXT > will not change the NODE, LONG HOLD the soft key to left of the NODE name until the NODE is outlined in RED.
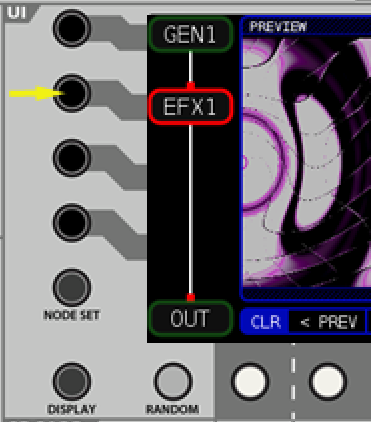
Press the same soft key button once to unlock the NODE.
Press the CLR soft key to unselect all SELECTED nodes (this will NOT unlock NODEs).
When you press the DISPLAY button you will go to the next page in the DISPLAY screens, entitled MODULATORS. If you accidently go past this page, you can press the DISPLAY button until you cycle back around. The order for the pages in the DISPLAY screens is:
PREVIEW -> MODULATORS -> FILES -> PARAMETERS -> PREVIEW
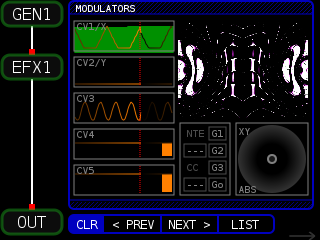
The MODULATORS page shows the incoming voltages from CV1/X to CV5. In the above screen shot, CV1/X is getting a saw wave that dips below zero, CV2/Y has no signal, CV3 is getting a sine wave, CV4 is set by the OFFSET knob to 50% (knob pointing directly left, like a clock pointing to 9), and CV5 is around 90%.
To the right of the CV graphic and under the PREVIEW window is the MIDI and GATE monitor graphic. It displays the MIDI note number under NTE and the MIDI CC (continuous controller) value under CC. Sharing the same box as MIDI are the GATE indicators for G1, G2, and G3 on the front panel. They will display orange if a gate or the button next to the gate is triggered. The Go label indicates the GATE OUT. This triggers a gate after a cycle of the internal timer completes and varies in interval based on the number and complexities of the NODES being used.
Advanced: More explicitly, internally STRUCTURE has two variables, ftime and itime. Depending on the time control set with the macros, ftime increases every frame by some small amount. It is the fractional time. It’s value is ALWAYS between 0.0 and 1.0. itime is the integer time and increases by 1 every time ftime exceeds 1.0 and is reset back to 0.0. The reason for this is ftime is used in cyclical animation calculations, think of it like a sawtooth accumulator. OUT generates a pulse every time itime changes.
Finally there is the XY box which shows the JOYSTICK behavior and recording (if one exists). When you move the JOYSTICK you should see the blue circle mimicking the movements. Depending on the modulation controls, moving the JOYSTICK may also affect the GEN1 and/or EFX1 NODE.
Starting from fw4.0 the JOYSTICK is always in absolute (movement on a 1:1 ration) mode and can not be changed.
The following italicized text below is left for historical purposes.
In the bottom left of the JOYSTICK graphic is the mode type. There are two options; ABS and REL. ABS (Absolute Mode) follows (and transmits the values as modulation sources from) the JOYSTICK movement on a 1:1 ratio. When you release the JOYSTICK, the blue circle will snap back to the center. If you press dark grey button under the red MOTION button, it will toggle the mode between ABS and REL (Relative Mode). In REL mode, the JOYSTICK will ‘push’ the blue circle (and the transmitted values) around but will not reset it to the center when you release the JOYSTICK.

You can press and hold the RED MOTION button and it will sample the XY movements from the JOYSTICK as you move it, then continuously loop the captured values. To clear the buffer, quickly press the red MOTION button once and it shold create a buffer of zero length, thus stopping any movement (make sure you are NOT touching the joystick in this case, or it will record the position it is in for the reset value).
Pressing the GREY button below the RED MOTION button brings up the MOTION screen. See https://erogenous-tones.com/docs/structure-user-guide/motion-page/ for more details.
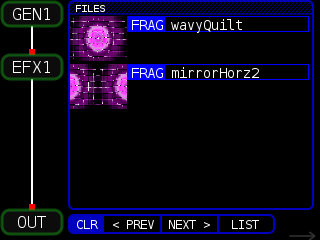
Pressing the DISPLAY button again will take you to the FILES page, where you can see the filenames of the GLSL fragment shaders that are being used for the NODES in the current NODE SET. In our example, it looks like this:
Pressing the DISPLAY button again brings us to the PARAMETERS page.
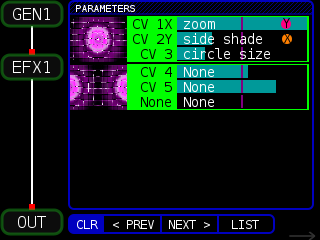
In the PARAMETERS page we can see the shader modulation sources and real-time graphic representation of the input values, including if the JOYSTICK is assigned to a parameter.
In the image above, the GEN1 shader has three inputs: ‘zoom’, ‘side shade’, and ‘circle size’ (these names are defined in the actual shader file – see the GLSL Shader section for more information). CV1X controls the ‘zoom’ amount and the Y with a red circle indicates that the JOYSTICK Y value (up / down) also modulates this parameter. The orange X (left / right) and CV2Y are assigned to the ‘slide shade’ parameter of the GEN1 shader. This particular EFX1 shader does not have any modulatable parameters, so they are all listed as None. In general, GEN NODES will have three controllable parameters and FX NODES vary and may have from zero to three parameters. For more information on which parameters can be controlled, refer to the NODE Dictionary.
Some NODES like 3D have more than three parameters. For these, only the first three will be shown on this page. To see all the parameters, select the NODE and then press the PARAMS button.
Pressing the DISPLAY button again will bring you back to the PREVIEW screen.
As you continue to turn the ENCODER knob you will scroll through all the NODE SETS. You will notice that there are quite a few of them and it can take a while to scroll through all of them. To more efficiently move through different NODE SETS and include (or exclude) certain NODES, press the NODE SET button to configure filters in the NODE SET page.
The NODE SETS in STRUCTURE are fixed and not editable at this time. The NODE SETS are designed with certain performance expectations which lead to some video flow designs being impractical. That said, if you think of a NODE SET we don’t currently have please contact us via the website or social media and we’ll see if it’s possible.